

AirTag battery replacement is a standard maintenance requirement for owners of the Apple tracking device. The manufacturer designs the AirTag to function for approximately one year on a single battery. This lifespan depends on the frequency of use and the environmental conditions where the device is kept. You will receive a notification on your connected iPhone when the battery level is low.
This notification appears as a system alert that tells you the battery must be replaced soon. You can also monitor the battery status manually by opening the Find My app on your mobile device. When you open the app, you select the Items tab and then tap on the specific AirTag you wish to check. The app displays a low battery icon if the power level has dropped below a certain threshold.
Selecting the correct parts for AirTag battery replacement
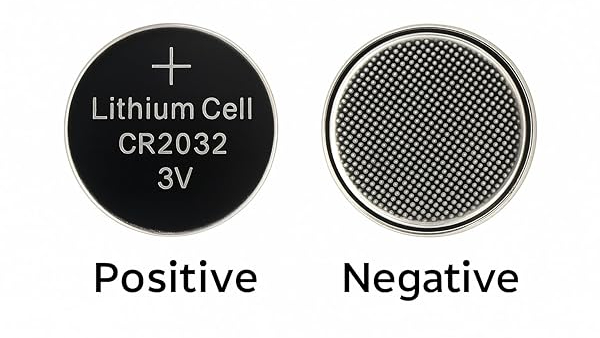
An AirTag battery replacement requires a specific type of power source. The device uses a CR2032 lithium 3V coin cell battery. These batteries are common and are sold in most grocery stores, pharmacies, and hardware stores. The name of the battery provides information about its physical dimensions. The first two digits signify the diameter in millimeters.
The last two digits signify the thickness in tenths of millimeters. Therefore, a CR2032 battery is 20 millimeters wide and 3.2 millimeters thick. You must ensure that the battery you purchase is exactly this size. Using a different size will prevent the battery cover from closing or will prevent the device from receiving power.
There is a specific technical detail you must check when purchasing a new battery. Many battery manufacturers, such as Duracell, apply a bitter coating to their coin cell batteries. This coating is intended to prevent children from swallowing the small objects. The coating has a very bitter taste that causes a child to spit the battery out immediately. However, this bitterant coating can interfere with the electrical connection in an AirTag. The coating acts as an insulator.
If the coating aligns with the internal contact points of the AirTag, the device will not turn on. Apple recommends using batteries that do not have this coating. If you have a battery with a coating, you can sometimes remove it using a cloth dampened with isopropyl alcohol. It is more reliable to buy a battery that is listed as having no bitterant coating.
Preparing for an AirTag battery replacement
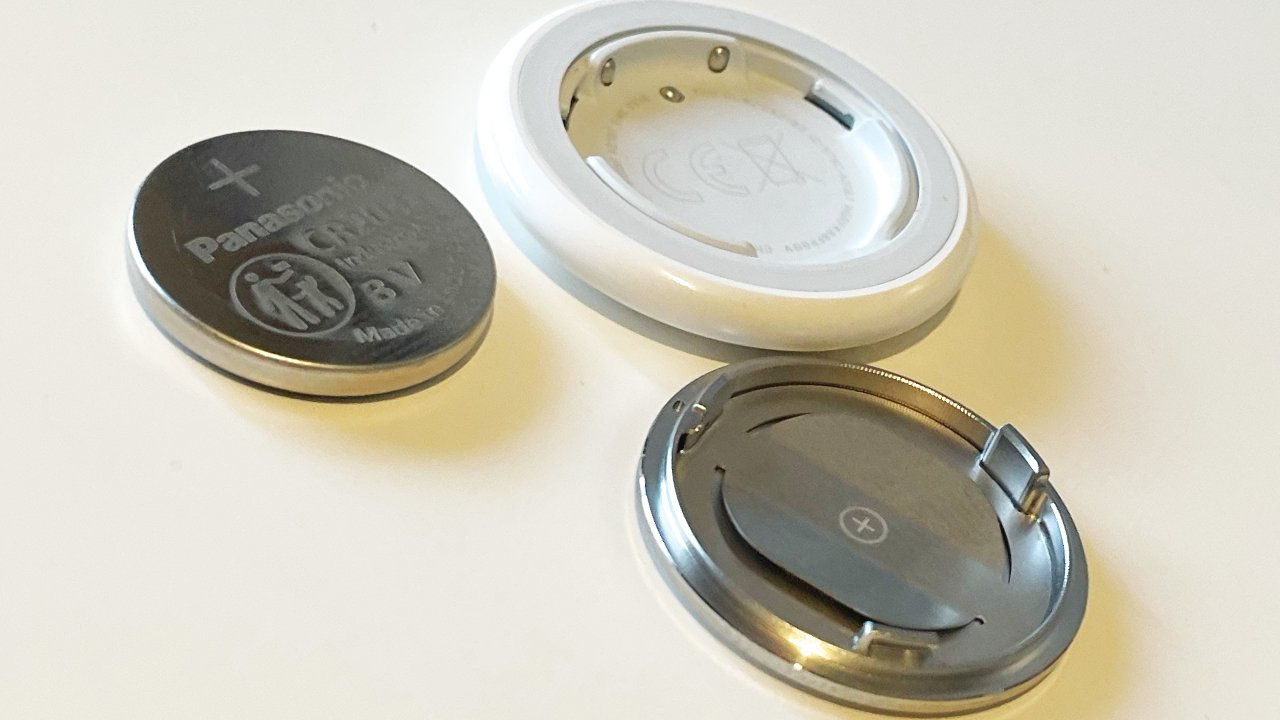
You should perform the AirTag battery replacement on a flat and clean surface. This prevents the small components from rolling away or becoming lost. The AirTag consists of two main external parts. The first part is the white plastic housing that contains the electronics. The second part is the silver stainless steel battery cover. This cover is held in place by three small tabs that lock into slots within the plastic housing. You do not need any tools to open the device. You only need to use your hands and fingers to apply pressure and rotate the components.
The device is built to be water-resistant with an IP67 rating. This means it can withstand being submerged in up to one meter of water for thirty minutes. The seal that provides this protection is located around the battery compartment. During the AirTag battery replacement, you should inspect this area for any dirt or debris. If dirt enters the compartment, it can damage the seal. You can use a dry cotton swab to gently clean the edges of the plastic housing while the cover is removed. Do not use water or liquid cleaners inside the battery compartment.
Step by step guide for AirTag battery replacement
To begin the AirTag battery replacement, hold the device with the silver side facing up. Use two fingers to press down firmly on the stainless steel cover. While you are pressing down, rotate the cover in a counter-clockwise direction. You will feel the cover move a short distance before it hits a physical stop. Once the cover has stopped rotating, you can release the pressure. The internal springs will push the cover up slightly. You can then lift the silver cover off the device and set it aside.
The old battery will be visible inside the circular opening. You can remove the old battery by tipping the AirTag over or by using your fingernail to lift the edge of the battery. Once the compartment is empty, take your new CR2032 battery out of its packaging. Look at the surfaces of the battery. One side is marked with a plus sign. This is the positive side. The other side is the negative side. Place the battery into the AirTag with the positive side facing toward you. You should be able to see the plus sign and the text on the battery after it is placed in the device.
When the battery makes contact with the internal terminals, the AirTag will play a sound. This sound is a series of electronic chirps. This audio signal indicates that the battery is installed correctly and that the device has power. If you do not hear a sound, the battery may be dead or it may have a bitterant coating that is blocking the electricity. You should remove the battery and check for any plastic film that might still be attached to it. Some manufacturers put a small sticker on the negative side of the battery for protection during shipping. You must remove this sticker before installation.
Finalizing the AirTag battery replacement
After you hear the chime, you can replace the silver cover. Look at the underside of the silver cover. You will see three small metal tabs. Look at the white plastic housing of the AirTag. You will see three corresponding slots. Align the tabs with the slots and place the cover onto the device. Press down firmly on the cover.
While maintaining this downward pressure, rotate the cover in a clockwise direction. The cover will turn until it reaches a stop. Ensure that the cover is flush with the plastic housing. If one side is higher than the other, the tabs are not correctly seated. You must remove the cover and try again to ensure the device remains water-resistant.
Once the cover is locked, the AirTag battery replacement is complete. You should check your iPhone to confirm the device is working. Open the Find My app and look at the item list. The low battery warning should no longer be visible. You can also test the device by using the Play Sound feature in the app. If the AirTag makes a noise, it is functioning correctly. The app will update the battery status within a few minutes of the replacement.
Troubleshooting an AirTag battery replacement
If the device does not play a sound after you insert the battery, there are several steps you can take. First, verify that the battery is a CR2032. Other batteries like the CR2025 look similar but are thinner and will not make a secure connection. Second, confirm that the positive side is facing up. If the battery is upside down, the device will not work. Third, check for the bitterant coating mentioned previously. You can try a different brand of battery to see if that resolves the issue.
Sometimes the stainless steel cover becomes difficult to turn. This can happen if the device has been exposed to sticky substances or if it has been dropped. You can improve your grip by using a piece of rubber or a latex glove. This provides more friction and makes it easier to rotate the metal surface. Do not use pliers or metal tools to turn the cover. These tools can scratch the finish or crack the plastic housing.
If the AirTag continues to show a low battery warning in the Find My app after a successful AirTag battery replacement, you may need to wait. The app does not always update instantly. You can force an update by moving the AirTag away from your phone and then bringing it back. You can also restart your iPhone to refresh the data in the Find My network. If the warning persists for more than twenty-four hours, the new battery may be faulty or low on charge. Some batteries sit on store shelves for long periods and lose their voltage.
Well, with the completion of this guide, you can now change the battery of your AirTags, quite easily, from the comfort of your home, and save on those unnecessary and sometimes exorbitant service charges. Good Luck!!
