

We browse through pages of data on our Android smartphones and tablets on a daily basis. This data can be anything from important emails, photos, web pages, social media posts, etc.
Sometimes, we come across content that we want to save for sharing with your friends or for future reference. In such cases, the best way to save such content on your smartphone is to take a quick screenshot. The best part is that thanks to advancements in the Android OS, you can now save a screenshot and even create custom markups or doodles on the screenshot before saving or sharing it.
There are primarily, two ways to take a screenshot on an Android smartphone –
- Using the hardware keys on your Android smartphone.
- Using gestures built into the UI (if applicable).
In this tutorial, we will show you how to take a screenshot on Android.
Table of Contents
Browse the content you want to screenshot on your Android smartphone.
Press the Power + Volume Down buttons together for 2-3 seconds.
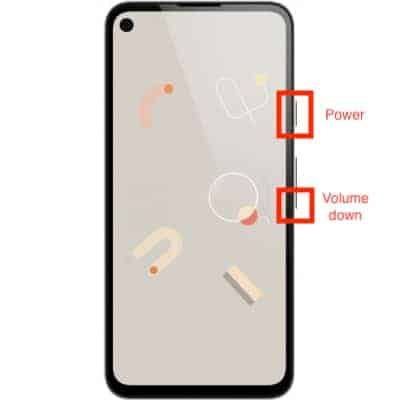
Crop and edit the screenshot as per your requirements.
You can now save it to your gallery, or directly share the screenshot with your friends on any social media apps.
Now, if the hardware combination does not work for some reason, you can long-press the power button and then tap on the ‘Screenshot’ option to grab the screen as required.
Please ensure that you do not install any third-party applications to take screenshots on your Android smartphone. The feature is built into each Android device by default, and these third-party apps have the potential to cause more harm than good to your smartphone.
We also mentioned that there are gestures that allow you to take a screenshot on your Android smartphone. There are many OEMs, each with its own custom gestures. The best thing to do in this case is to look up the official website of your smartphone brand and look up the appropriate gestures for taking screenshots.
