
If you have been editing photos in Photoshop for any length of time, you already know the minor frustration of needing to open the Camera Raw filter every single time you want to adjust haze or add clarity to an image. It works, but it pulls you out of your layer-based workflow and adds unnecessary steps to what should be a quick tweak. Adobe has finally fixed that with the new Photoshop Clarity and Dehaze layer, and honestly, it is one of those updates that makes you wonder why it was not there from the start.
Announced on January 27, 2026, this round of Photoshop updates covers more ground than just the headline features. There is a new Grain layer, a beta version of Dynamic Text, significant improvements to Generative Fill and the Remove Tool, and more nuanced control over Reference Image. Adobe describes the overall goal of the update as giving users greater “control, realism, and precision,” and while that kind of language can sometimes feel like marketing filler, the specific features in this release actually back it up.
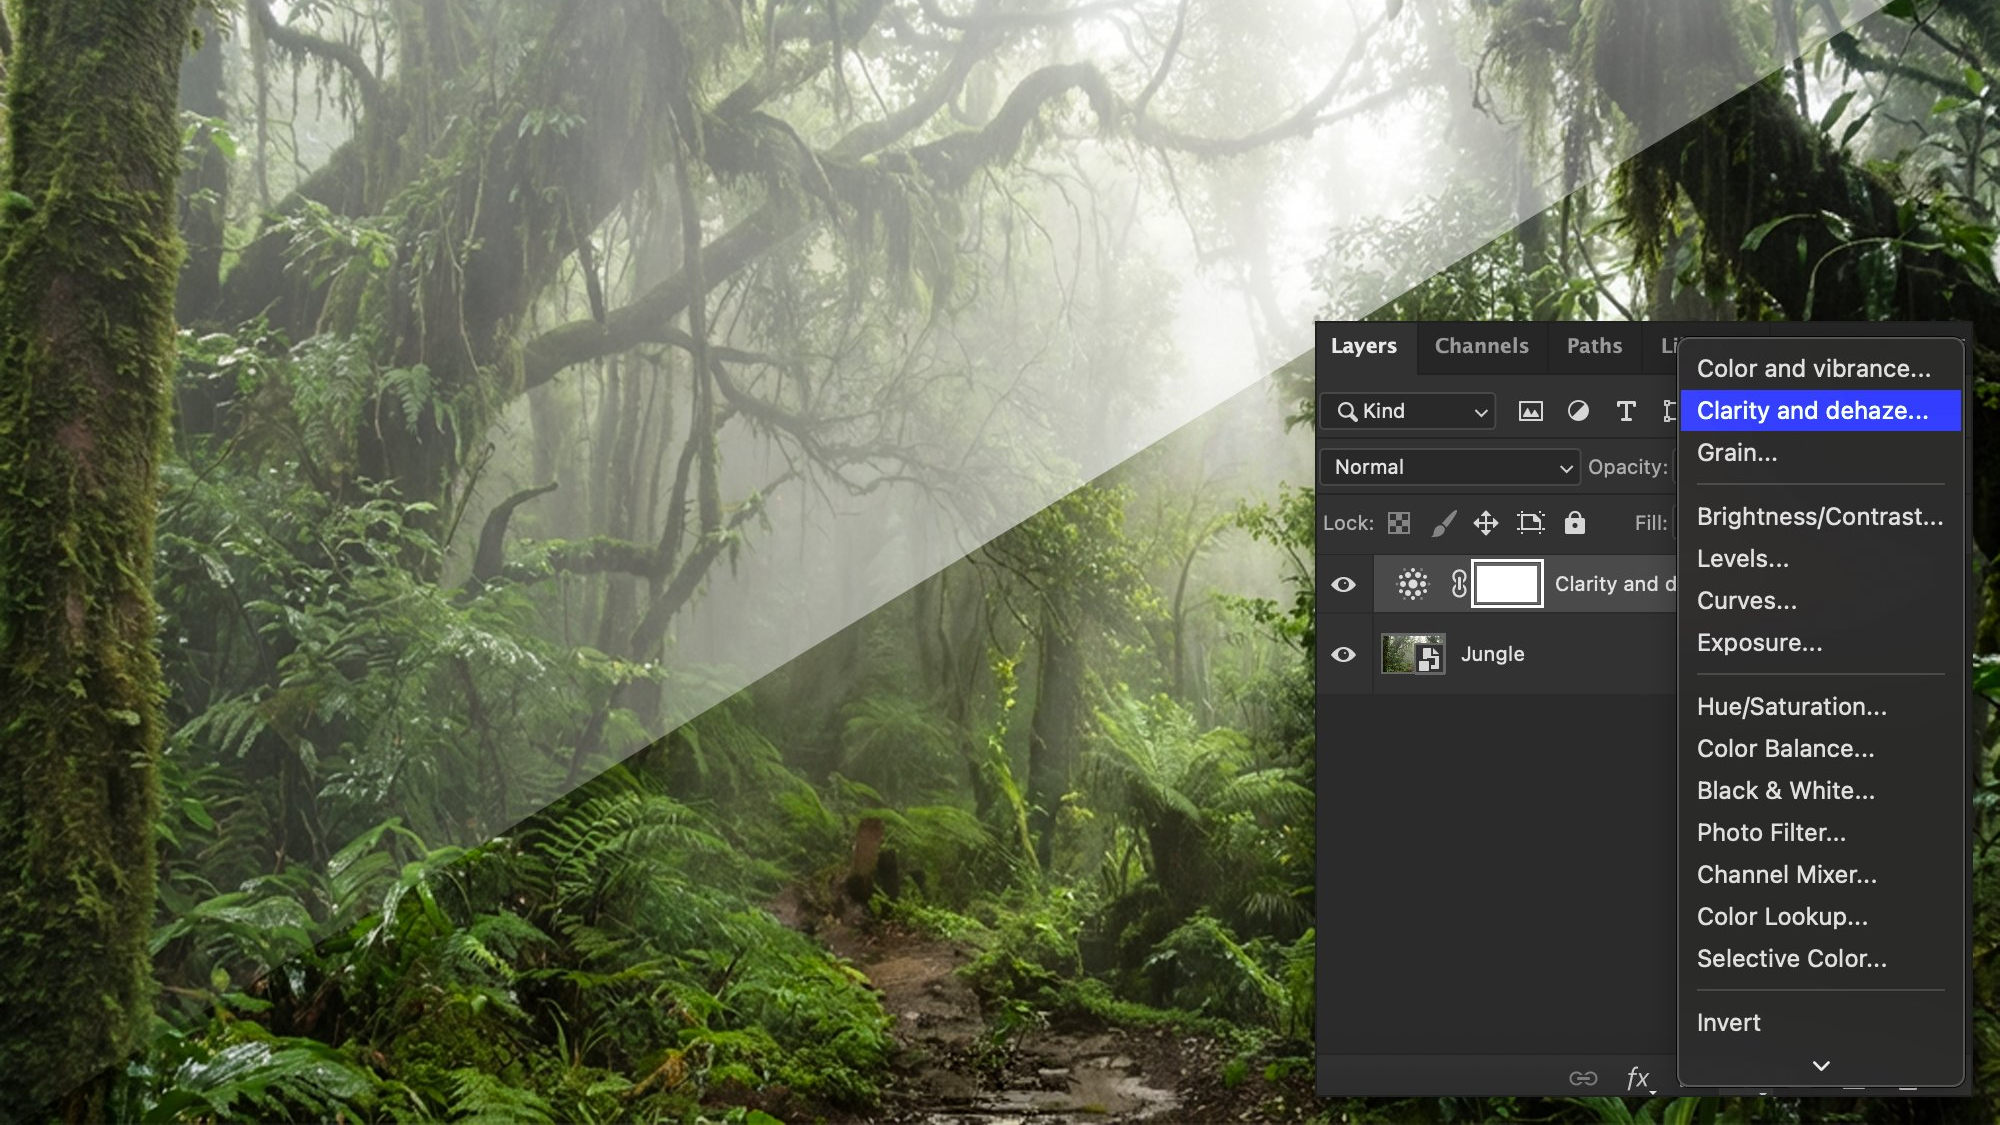
What the Clarity and Dehaze layer actually does
For anyone not already steeped in Photoshop workflows, a quick bit of context helps here. Clarity and Dehaze are both image adjustments that affect the midtone contrast and atmospheric haze in a photo. Clarity sharpens the perceived definition in a shot by boosting local contrast in the mid-tones, which makes subjects look crisper and more grounded. Dehaze, as the name suggests, cuts through atmospheric haze, fog, or flat lighting conditions to bring back detail and balance.
Both of these tools existed in Photoshop before this update, but only accessible through the Camera Raw filter, which meant leaving your normal layer-based workspace, making adjustments, and coming back. It was not a disaster, but it was an interruption, and for professional photographers or retouchers doing high-volume work, those interruptions add up.
The new Photoshop Clarity and Dehaze layer brings both tools into the standard Adjustments panel as proper non-destructive, maskable layers. This means you can apply them directly to your layer stack, mask them to specific areas of the image, blend them with other adjustments, and tweak them at any point without committing to the changes permanently. That is the kind of precise, flexible control that professional workflows actually need, and Adobe says this feature came directly from community feedback.
The new Grain layer and what it adds to your workflow
Alongside the Photoshop Clarity and Dehaze layer, Adobe has also introduced a Grain adjustment layer. This one is going to make a lot of film photography enthusiasts and portrait retouchers very happy.
Adding grain to a digital photograph is not just about making it look old or nostalgic. Done well, grain adds a tactile, organic texture that makes a digitally-edited image feel more substantial and three-dimensional. It is used regularly in commercial photography, portraiture, and editorial work because smooth, noiseless digital images can sometimes look clinical or artificial. Having grain available as a non-destructive, maskable layer means you can apply it selectively, add more grain to backgrounds while keeping subjects cleaner, or dial it back without having to start again.
Like the Clarity and Dehaze additions, both Grain and Clarity and Dehaze layers are now available as a general release, meaning they are not in beta and are accessible to all Photoshop users right away.
Dynamic Text is the small feature that should not have taken this long
Now in beta, Dynamic Text is a straightforward quality-of-life addition that somehow feels overdue. The way it works is simple: you click a text layer, select a shape from the available options (circular, arched, or bowed), and Photoshop automatically fits and resizes the text to match that shape.
If you have ever tried to manually curve text around a circular object in Photoshop, you will know that it involves work paths, type on a path tools, and a fair amount of fiddling to get it looking right. Dynamic Text takes that process and makes it close to instant. It is the kind of feature that saves not hours but those small pockets of five to ten minutes that accumulate over a busy day of work.
The beta status means it is still being refined, but it is available to try now for anyone who wants to get ahead of it before general release.
Generative Fill and the Remove Tool get a proper upgrade
On the AI side of things, the updates to Generative Fill, Generative Expand, and the Remove Tool are worth paying attention to, particularly if you have been frustrated by the resolution limitations of AI-generated outputs in previous versions.
All three tools can now produce outputs at up to 2K resolution. That might not sound dramatic on paper, but if you have ever run Generative Fill on a high-resolution image only to get a result that looks sharp until you zoom in, you will understand why this matters. Adobe promises sharper detail and fewer artifacts, alongside better matching of natural lighting and depth in generated content.
The Remove Tool specifically has been updated to a new version (Remove Tool 3), which should handle complex backgrounds more cleanly and produce fewer of the smearing or patching artifacts that have been common complaints with earlier iterations.

Reference Image control for Generative Fill is a big deal for ecommerce
One of the more practically significant updates in this release is the expanded control over Reference Image for Generative Fill. This feature allows you to use a reference image to guide the style, lighting, and character of whatever Generative Fill creates within a selected area.
The update makes the AI significantly better at retaining what Adobe calls the “identity” of the original product when you are swapping one object for another. In their own demonstration, the example used was swapping one handbag for another while preserving the perspective, scale, rotation, lighting, color, and depth of the original scene. The description of results being “geometry-aware” is the key phrase there. It means the AI is not just filling in a gap; it is reading the spatial context of the scene and placing new content as if it genuinely belongs there.
For photographers and designers working in ecommerce or product marketing, this is a meaningful practical improvement. Shooting multiple product variants at consistent angles and in consistent lighting is time-consuming and expensive. If Generative Fill can do that convincingly at 2K output quality, it opens up a real reduction in production overhead.
Where to find all the new features
All of the updates mentioned here are available now in the desktop version of Photoshop. The Firefly-powered tools, including the upgraded Generative Fill, Generative Expand, and Remove Tool, work across both the desktop app and Photoshop on the web.
The Photoshop Clarity and Dehaze layer and Grain layer are in general release, so no waiting around for them. Dynamic Text is in beta, which means it should become available to all users after the testing period wraps up.
For anyone using Photoshop professionally, this update is genuinely one of the more useful collections of changes Adobe has pushed out in a while. The AI improvements are real and practical rather than just demonstrative, the new adjustment layers address a specific and well-known workflow gap, and Dynamic Text is a small but welcome convenience. Not everything here will change how every user works, but the Photoshop Clarity and Dehaze layer alone has been a long time coming, and it is good to see it arrive properly.
