
You wouldn’t know it by looking at a Chromebook, but Google’s Chrome OS is constantly evolving. Minor updates are released every two to three weeks, with major releases every six weeks. And, at any one time, Google employees are working on features and software advancements that most consumers will not see for weeks — or months.
But here’s a little secret: if you’re feeling brave, you can acquire access to those previously unreleased features. All it takes is the flip of a virtual switch in your Chromebook’s settings to have a slew of additional options at your disposal. First, it’s critical to understand what’s involved so you can make an informed decision about which setup is best for you.
What are the ChromeOS Channels?
If you are not aware of what ChromeOS channels are, here is a quick guide –
The Stable channel contains the polished and ready-to-use version of the software that all devices used by default.
The Beta channel is updated regularly and gets new features around a month before the Stable channel.
The Developer channel is updated as frequently as twice a week and contains information that is currently being worked on but has only received a limited amount of testing.
Finally, the Canary channel is what Google refers to as the “bleeding edge” Chrome OS path – a channel that receives daily updates prior to any wider testing and can only be accessed by a Chromebook in developer mode.
The Stable channel is the safest option and should be used by the great majority of individuals, especially those who need to know their computers will always perform properly without any hitches or unforeseen glitches.
If you’re feeling daring and don’t mind taking a chance, the Beta channel is a nice method to get a sneak peek at unreleased features without experiencing too much instability. The chances of seeing something strange are undoubtedly greater than with Stable, but elements in Beta are often well-developed and in the last stages of testing.
Most regular users would be wise to avoid the Developer channel because it receives updates as they are built and is prone to errors. And, if you’re not sure whether you should be using the Canary channel, the answer is usually no.
However, if you are an enthusiast, and want to try and see what happens when you change the ChromeOS channel, this is how you can do it.
Step 1. Navigate to your Chromebook’s settings.
Step 2. In the menu on the left, select About Chrome OS, followed by Additional details.
Step 3. Look for the Channel category and click the Change channel button. A pop-up will display, allowing you to select the Stable, Beta, or Developer channel. (Remember, Canary is only available if your device is in Developer mode, which allows for more complex forms of OS modification but also removes some of the software’s standard layers of protection.) It requires several additional steps to enable and, once again, is not recommended for most Chromebook users.)
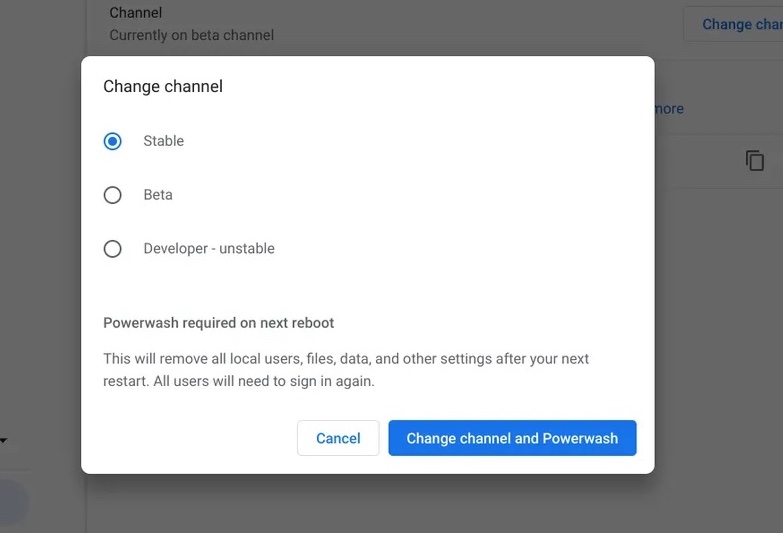
Step 4. Click the desired channel, then the blue Change channel confirmation button that appears.
Step 5. To return to the About Chrome OS page, click the left-facing arrow at the top of the screen. Click the Restart button towards the top of the page when it appears (this may take a minute or two).

Step 6. When your Chromebook has finished rebooting, you’ll be on your new channel, with all of your accounts, files, and preferences just where you left them.
If you ever decide to return to the Stable channel, simply repeat the process and pick Stable. Now, if your Chromebook is linked to a G Suite account at work or school, your data will not be destroyed, and the change will not take effect immediately. Instead, you’ll have to wait until the lower channel catches up to the upper one in version number, which could take several weeks to several months.
