
DaVinci Resolve by Blackmagic Design isn’t just another run-of-the-mill video editing software; it’s a powerhouse trusted by the film industry’s elite, from blockbuster creators to Oscar-winning directors. But what sets it apart is its accessibility to passionate enthusiasts, thanks to a robust free version that packs a punch. However, delving into this expansive and feature-rich software demands an investment of your time and effort, if not your wallet.
In the realm of video editing, motion graphics, color grading, and audio production, DaVinci Resolve stands as an all-in-one solution, akin to a toolkit of creative possibilities. While some consumer-grade apps offer similar features, this behemoth of a program not only lives up to expectations but also introduces innovative tools that can redefine your editing experience. Yet, it doesn’t adhere to the familiar conventions of video interfaces and workflows, making it a thrilling but initially challenging journey to navigate.
First Boot impressions
Embarking on your DaVinci Resolve journey requires setting up a compatible environment to ensure a smooth experience with this versatile software. DaVinci Resolve is known for its flexibility in terms of system requirements. Here’s an expanded breakdown of the software’s compatibility:
- Operating Systems: DaVinci Resolve is available on multiple operating systems, making it accessible to a wide range of users.
- macOS: You can use DaVinci Resolve on macOS starting from version 10.14.6 Mojave onwards. This compatibility includes the latest versions of macOS, ensuring that Mac users have access to this powerful tool.
- Windows: For Windows users, DaVinci Resolve is compatible with Windows 10, beginning with version 1703. This means that both older and newer Windows 10 systems can run the software effectively.
- Linux: DaVinci Resolve is also available for Linux, specifically on CentOS 7.3 or later. CentOS is closely related to Red Hat Enterprise Linux, which ensures stability and reliability for Linux enthusiasts.
- Minimum RAM Requirements: To ensure a smooth performance, it’s recommended to have a minimum of 16GB of RAM. This amount of memory allows you to run DaVinci Resolve efficiently for basic video editing tasks.
- Advanced RAM for Specific Needs: If you plan to use DaVinci Resolve on Linux or want to explore the realm of Fusion motion graphics, it’s wise to aim for at least 32GB of RAM. This increased memory capacity provides the resources necessary for handling more complex tasks and projects effectively.
- Apple Silicon CPU Support: For users with Apple Silicon CPUs, the good news is that DaVinci Resolve supports them natively. This native support not only ensures compatibility but also promises improved performance. With the increasing popularity of Apple Silicon, this is a significant advantage for Mac users.
Downloading DaVinci Resolve is a breeze, with the installer weighing in at a reasonable 3GB. This is slightly more streamlined than Premiere Pro’s 3.3GB offering, sans the motion graphics and Media Encoder software. My test setup involved a Windows version running on a Core i7 PC armed with 16GB of RAM.
Upon acquiring the installer, you proceed with the installation of the DaVinci Resolve program. Optionally, you can also install its Control Panels, Raw Player, and Fairlight Audio program. Interestingly, the installation requires a system reboot, a rarity in today’s software installation landscape. Nevertheless, DaVinci Resolve managed to start up reasonably quickly given its size.
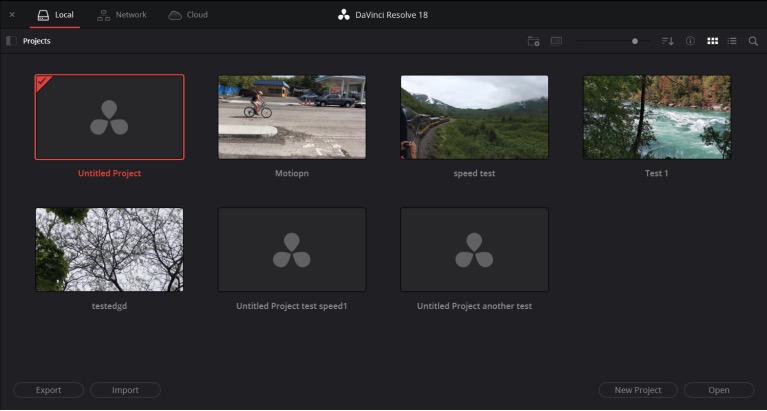
As you embark on your creative journey, the Project Manager window welcomes you with hover-scrubbable thumbnails for each of your ongoing projects. Here, you can seamlessly open, import, or export projects, whether they reside on your local machine, a network, or within the Blackmagic cloud.
Launching a new project reveals a minimalist window featuring a single entry: ‘Untitled Project.’ Unlike some other video editing tools, DaVinci Resolve doesn’t hold your hand extensively, nor does it offer the kind of assistance that Adobe is integrating into Premiere Pro or the user-friendly guidance found in consumer-focused apps like Movavi Video Editor Plus. However, it compensates for this with comprehensive help documentation that can guide you through any hurdles.
The User-Interface
DaVinci Resolve introduces a unique organizational structure for its features, setting it apart from conventional video editing software. Rather than traditional modes, it offers seven distinct pages: Color, Cut, Deliver, Edit, Fairlight (specifically for sound), Fusion, and Media. These pages can be accessed conveniently through buttons along the bottom of the program window, but for users accustomed to a different approach, adapting to this arrangement might present a steep learning curve.
Given the complexity of this software, maximizing screen real estate is essential, and DaVinci Resolve excels in providing a full-screen view. Users can select from Auto, 100%, 150%, or 200% UI scaling options, making it adaptable for high-DPI displays. In my case, with a QHD display, the Auto setting provided crisp and readable scaling, a challenge that many other applications struggle with, particularly on resolutions beyond HD or 4K.
The Media page serves as the hub for discovering and organizing your media assets, making use of color coding, bins, and metadata. Additionally, it allows for the convenient pre-trimming of source clips using the I and O keyboard shortcuts.
Transitioning into Editing mode, whether on the Cut or Edit page, you’ll encounter the familiar three-panel interface. The top left houses the source panel, the top right offers a video preview, and the timeline stretches across the entire bottom. Much like Final Cut and Premiere Pro, DaVinci Resolve provides tools such as take selectors, compound clips, and nested timelines, resulting in a flexible and potentially intricate timeline structure.
Notably, the Cut page presents two timelines: the primary one at the bottom, displaying image frame previews and audio waveforms, and a solid blue one at the top, primarily useful for navigation purposes. While you can view source material in thumbnail, metadata, strip, or list views, the thumbnail size remains fixed.
The Source panel grants you control over what appears in this section, offering options such as Media Pool, Sync Bin, Transitions, Titles, and Effects. A search box simplifies the process of finding specific assets across all pages.
DaVinci Resolve lets you decide between a locked or free playhead mode. In the former, you move the clip while the playhead remains centered, akin to a different editing style. The latter option resembles what you’d find in most other editors, where you move the playhead rather than the media itself. However, I encountered a minor hiccup when trying to zoom the timeline using the Alt-Mouse wheel action in the Cut page, although it worked seamlessly in the Edit page. Fortunately, there are buttons for Full Extent Zoom, Detail Zoom, and a custom zoom slider to compensate for this.
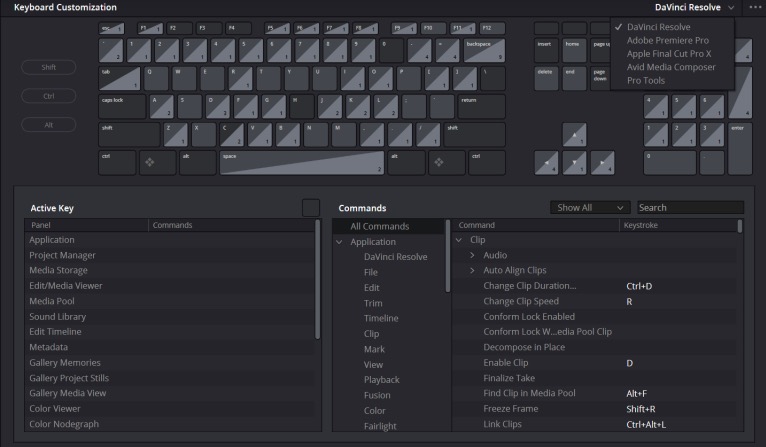
Expect a wealth of keyboard shortcuts at your disposal, with J for reverse, K for stop, L for forward, and Spacebar for playback control. For power users, the Keyboard Customization panel offers extensive customization options, including the ability to configure the program to use Final Cut or Premiere Pro shortcuts. An excellent feature in the Fusion page is the ability to press Shift-Spacebar, which summons a searchable list of all available tools for your project.
Much like Premiere Pro, DaVinci Resolve embraces multiuser collaboration workflows, enabling editors, colorists, and sound professionals to collaborate seamlessly on the same timeline, even simultaneously. The use of proxy media enhances efficiency in these scenarios, and DaVinci Resolve integrates smoothly with Frame.io, an online collaborative video editing platform that streamlines project synchronization.
Editing a video on DaVinci Resolve – Basic Editing, Effects, Transitions, and more
When you dive into the world of video editing using DaVinci Resolve, you’ll encounter a versatile array of tools and features, starting with the process of adding clips to your timeline in Cut mode. Here, you have a range of options at your fingertips: Smart Insert, Append, Ripple Overwrite, Close Up, Place on Top, and Source Overwrite (the latter requiring synced time codes in the clips). As expected in professional video editing, you can trim source clips before integrating them into your timeline.
In the midst of working on your video project, the preview window smartly divides into two, revealing the commencement and conclusion frames along with a compact timeline that clearly denotes frame numbers. Furthermore, you have the capability to set in and out markers on the timeline, allowing you to precisely specify where a clip from your source should be incorporated into your video project.
DaVinci Resolve also provides robust support for three- and four-point editing, permitting you to establish in and out points both in the source and on the timeline. This level of control empowers you to fine-tune the positioning of clips within your video project with precision.
DaVinci Resolve intelligently selects the appropriate editing tool based on your cursor’s position, whether it’s a roll edit, transition duration adjustment, or slip-and-slide operation. However, you always have the option to manually choose your preferred editing mode.
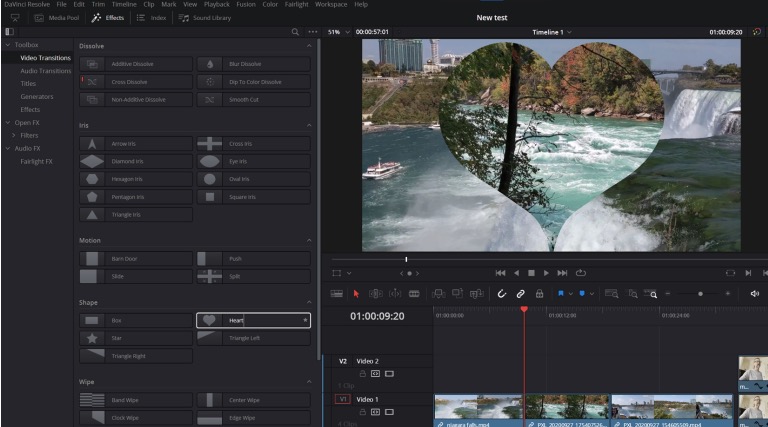
In the realm of transitions, professional video editors often steer clear of canned transitions commonly found in consumer-grade software. Instead, they opt for custom transitions to achieve a distinct look and feel. DaVinci Resolve provides access to transitions in either the Cut or Edit page, with a dedicated button on the former and a toolbox within the Effects section on the latter.
What sets DaVinci Resolve apart is its exceptional transition interface. It presents transitions as simple monochrome shapes in the list, but when you hover over an entry, your own timeline clips illustrate how the transition will appear in the viewer when applied. This visual representation adds a level of clarity and convenience. Additionally, the Fusion Transitions section introduces captivating transitions like Camera Shake, Drop Warp, and Tunnel of Light.
The process of applying transitions varies, with some being draggable directly onto the timeline. For transitions that require more clip content, the program offers the option to automatically overlap clips when you select ‘Add to Selected Edit Points and Clips’ from the context menu. Furthermore, any effects you apply come under scrutiny in the Inspector panel, accessible from the top-right button. Here, you can control effects using keyframes, smoothly animating parameters from the start keyframe to the end.
DaVinci Resolve’s Fusion Studio editor employs a unique node-based workflow that may seem unfamiliar to the average enthusiast-level video editor. This approach resembles an input/output system, where you add effects and media along a flowchart and connect one node’s output to another node to its right. This intricate system allows for the reuse of effect groups and precise control over selected image areas.
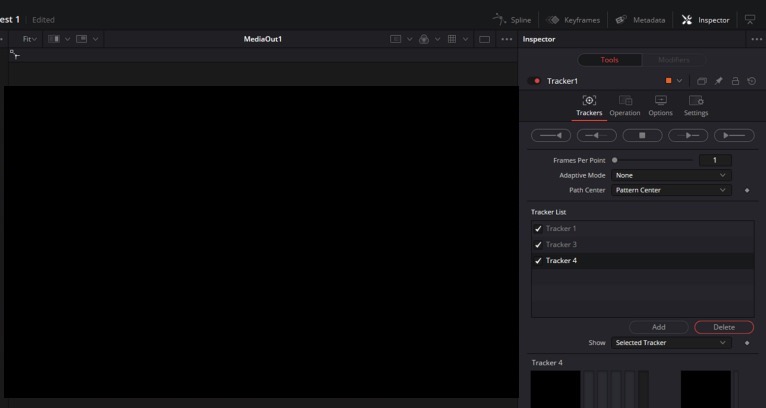
In the realm of motion tracking, DaVinci Resolve excels, even supporting multiple tracks. This involves creating nodes in Fusion, and it’s worth noting that this process is more intricate compared to consumer software like Corel VideoStudio. The program offers multiple tracker tools, including Camera, Planar, and Point trackers. The last two take 3D space into account, tracking objects across three axes. A new capability even allows for tracking surfaces as they warp.
For those looking to adapt their video for different platforms, DaVinci Resolve introduces ‘Smart Reframe,’ akin to tools recently seen in Adobe Premiere Pro and Apple Final Cut. This feature transforms a landscape scene into a vertical smartphone-shaped canvas, automatically maintaining the point of interest within the frame. Please note that ‘Smart Reframe’ is exclusively available in the paid Studio version of DaVinci Resolve.
Chroma keying in DaVinci Resolve might require a bit of exploration. To apply a chroma key effect, you’ll need to switch to Edit mode, even though you can access and apply effects in Cut mode and through the Inspector. Additionally, you’ll need to switch the viewer window mode to ‘Open FX Overlay view.’
Once configured, you can select the color you wish to key out by drawing a box around it. The program offers a reasonable starting point for fine-tuning, and simply checking the ‘Despill’ box can remarkably improve keying results, especially in challenging scenarios like frizzy hair.
Creating picture-in-picture effects is a straightforward process. Activate the Transform or Crop tool below the preview player, and then resize and position the overlay to your liking.
DaVinci Resolve simplifies stabilization with a user-friendly option in the Inspector. You have three stabilization modes to choose from: Perspective, Similarity, and Translation. Perspective is the standard mode, considering motion on all axes. Similarity offers the same functionality but with added measures to avoid introducing image artifacts.
Translation restricts stabilization to the X and Y axis (two-dimensional motion). In true DaVinci Resolve fashion, you’ll find an abundance of adjustment options for stabilization, including zoom, cropping ratio, and strength. Impressively, the tool operates swiftly in comparison to Final Cut and Premiere, allowing you to fine-tune stabilization with ease.
Multicam editing stands as another strong suit of DaVinci Resolve. You can effortlessly synchronize by timecode or sound, utilizing as many angles as you require. However, note that the interface can display a maximum of four angles at once, a standard limitation in professional video editing software.
Colour-Grading, Titles and Audio Editing done right
DaVinci Resolve doesn’t hold back when it comes to color grading. It boasts an impressive arsenal of color wheels and spectrometers, setting the stage for professional-grade color manipulation. Users can seamlessly copy grades, employ LUTs (Look-Up Tables), and exert fine control over edits using keyframes and Fusion nodes. DaVinci Resolve also taps into the power of AI for color matching, extends support for camera raw modes, and provides both temporal and spatial noise reduction tools.
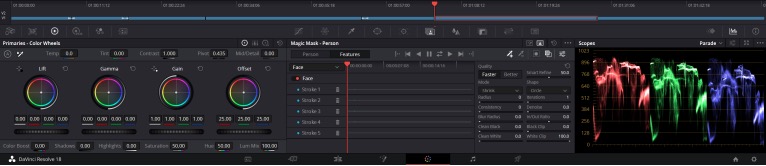
One standout addition in version 18 is automatic object selection, a game-changer for precision editing. With a simple scribble on an object or person (with separate modes for each), you can create a ‘Magic Mask’ (available as a paid license feature). This mask can then be applied to track color edits, ensuring they affect only the selected area as it moves—a truly innovative feature.
Within DaVinci Resolve’s Effects Library, the Titles section offers a range of options, from basic lower thirds and scrolls to static text elements. These titles are highly customizable, allowing you to adjust size, position, rotation, color, font, and additional attributes like drop shadow, stroke, and background color. Beyond these basics lie the Fusion Titles, which introduce a wealth of choices, many featuring animations, including 3D animations.

The audio editing capabilities in Resolve’s Fairlight audio editor are nothing short of impressive. It supports up to 2,000 audio tracks, and you can even perform simple volume adjustments directly within the timeline by manipulating the audio waveforms. An intuitive mixer control sits conveniently to the right of the timeline, offering ease of access for adjustments.
DaVinci Resolve provides access to a comprehensive range of advanced audio effects, including chorus, de-esser, de-hummer, echo, compressor, and noise reduction. Remarkably, many of these effects are accessible not only on the dedicated Fairlight page but also directly within the standard Edit page. For added convenience, you can access a library of royalty-free stock audio from Blackmagic’s website for integration into your DaVinci Resolve projects.
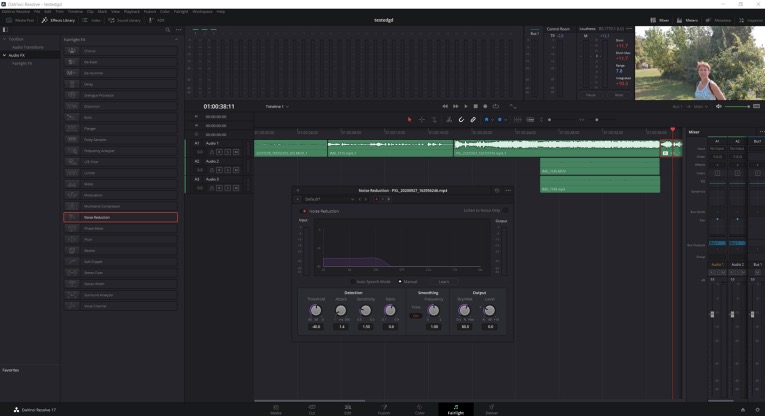
New features in DaVinci Resolve introduce powerful enhancements to audio editing. An automatic dialog leveler streamlines the process of ensuring consistent audio levels. The introduction of Fairlight automation vector keyframing opens up new creative possibilities for audio manipulation. Additionally, a new timeline grid aids in synchronizing audio and video, simplifying the alignment process.
DaVinci Resolve Performance
Despite its considerable complexity, DaVinci Resolve demonstrates commendable speed and stability in its operations. However, during my testing of the free version, I encountered a somewhat unusual message: ‘Your GPU memory is full.’ This was a first in my experience with video editing software.
The culprit turned out to be the default proxy resolution, which was set to full resolution. Lowering the resolution by half resolved the issue, although processing the proxies did take a bit of time, causing the preview to temporarily freeze. It’s worth noting that DaVinci Resolve intelligently harnesses GPU power for acceleration but with some nuances.
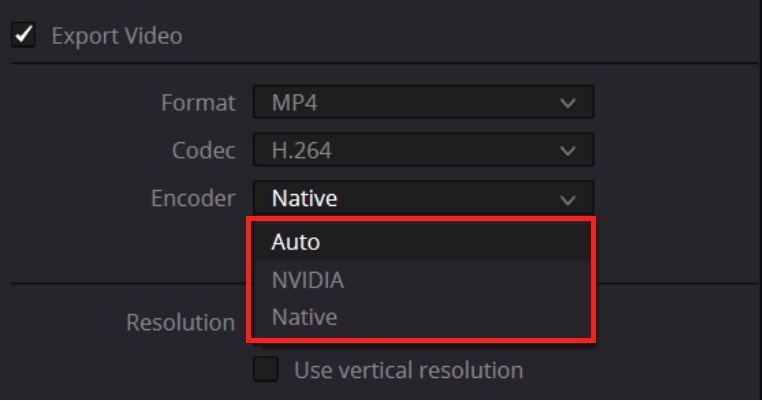
For assessing render speed, I subjected each video editing program to a rigorous test: combining seven clips of varying resolutions, ranging from 720p all the way up to 8K, and applying cross-dissolve transitions between them. The benchmark involves rendering the project to 1080p30 with H.264 compression and 192Kbps audio.
The resulting video spans just over five minutes. These tests were conducted on a Windows 11 PC sporting a 3.60GHz Intel Core i7-12700K, 16GB of RAM, an Nvidia GeForce RTX 3060 Ti, and a 512GB Samsung PM9A1 PCIe 4.0 NVMe SSD.
As illustrated in the chart, DaVinci Resolve performs admirably, landing in the middle of the group. In past assessments, the Native software encoder yielded notably slower results. However, with my current setup, it took approximately the same amount of time whether using that setting or the ‘Auto’ setting, which leverages your graphics hardware (in my case, Nvidia). Regardless, I recommend opting for the ‘Auto’ setting for an optimal performance experience
DaVinci Resolve Pricing
The free download version of DaVinci Resolve has garnered a considerable following among YouTubers and gamers, primarily because it offers a substantial subset of the program’s editing capabilities without the pro-level features that may not be essential for their needs. It stands as one of the most potent free video editing options available, boasting a surprisingly robust feature set that encompasses standard editing and cutting, effects, motion graphics, color correction, and audio editing.
However, it’s worth noting that certain advanced functionalities, such as the DaVinci Neural Engine, stereoscopic 3D tools, a plethora of additional Resolve FX filters, Fairlight FX audio plug-ins, advanced HDR grading, and HDR scopes, are notably absent in the free version. During testing, I occasionally encountered messages indicating the need for a paid subscription to access specific tools. This is entirely reasonable, considering the extensive array of features still available for free.
For users seeking access to all the premium features, DaVinci Resolve offers a one-time payment option priced at $295. It’s important to note that a full license can only be obtained through authorized resellers like B&H Photo Video. This approach is likely due to Blackmagic’s offering of optional custom keyboards and panels designed to enhance the software’s functionality. These range from the $295 Speed Editor keyboard to the premium $27,585 Advanced Panel. Blackmagic also caters to the professional market with cinema and studio cameras, spanning from the $1,295 Pocket Cinema Camera 4K to the $6,385 URSA Mini Pro 12K.
Comparatively, the $295 price point of DaVinci Resolve places it just slightly below the $299 cost of Apple Final Cut Pro. However, it’s important to note that Final Cut Pro requires additional purchases, such as the $49.99 Motion and the $49.99 Compressor ancillary apps, to achieve feature parity.
On the other hand, Adobe Premiere Pro follows a subscription-based model, priced at $20.99 per month with an annual commitment. When considering the long-term cost, it becomes evident that after a year and three months, you would have spent more on Premiere Pro than on DaVinci Resolve.
Conclusion
Conclusively, DaVinci Resolve emerges as an exceptionally potent professional video editing application, offering a rich palette of adjustments and effects tailored to the most intricate editing demands. Nevertheless, it’s imperative to recognize that newcomers should expect a substantial learning curve, given that the software’s interface and workflows deviate from the standard conventions of video editing software. Furthermore, it’s essential to be aware that DaVinci Resolve places greater demands on your system’s capabilities compared to many of its counterparts, which can impact the editing process.
The free version of DaVinci Resolve is a standout offering, as it isn’t time-limited and provides a substantial toolkit that proves highly valuable for many amateur video editors. It offers a taste of the software’s capabilities without requiring an upfront investment. For those seeking to explore the depths of professional video editing, DaVinci Resolve unquestionably ranks among the top choices in the industry.
This assessment underscores the software’s robustness and versatility, making it a potent tool for video editing enthusiasts and professionals alike. If you have any further questions or specific points to address, please feel free to share them.
