

Most computers feature fans that keep the CPU cool and operational at optimum performance levels. However, Windows does not provide you with a straightforward way to change the speed of the fan as per your requirement. However, there are three ways in which you can modify the speed of the fan in your Windows computer –
Using First-Party Software – Modern computers are frequently compatible with proprietary software that allows you to adjust the speed of the CPU fan. This is the quickest and most straightforward option, but you must first obtain the appropriate software.
Using the BIOS – Most PCs come with a BIOS that can show you the current speed of your CPU fan, and more feature-rich BIOSes will allow you to modify the speed of your CPU fan. It is possible to accomplish this without the use of software, but the process can be time-consuming.
Using third-party software – Third-party utilities are capable of determining the speed at which your CPU fan is spinning. Some of them even allow you to modify it. These utilities are compatible with a wide range of hardware, but you may face defects and incompatibilities as a result of their use.
In this tutorial, we will show you how to control the CPU fan speed on your Windows computer using the BIOS.
BIOS is the primitive operating system that runs on the motherboard of your computer. When you switch on your computer, the BIOS software begins to run. The majority of BIOSes allow you to view and adjust the CPU fan speed.
Step 1. Shut down your Windows computer.
Step 2. Once the shutdown process is complete, restart your computer and immediately press the shortcut that launches the BIOS settings on your computer’s desktop. Although this varies from PC to PC, the F2, F12, and Delete keys are often accepted.
Step 3. To view fan settings, look for a menu choice that says “Fan Settings.” This varies from motherboard to motherboard, although it is frequently displayed under PC Health, Advanced, or Overclocking. It’s possible that fan speed options are already accessible on the first menu that appears if you are lucky.
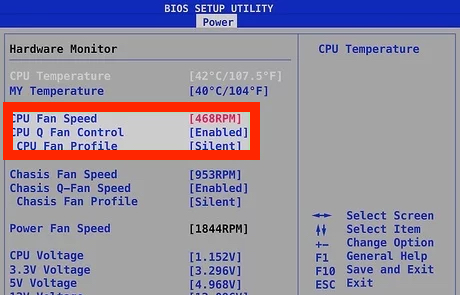
Step 4. The fan speed settings will normally be expressed as a percentage of the maximum fan speed in the BIOS. The fan’s highest setting is 100, while its lowest setting is 0. A number of 0 represents the fan’s lowest setting. Save and exit after making the changes you desire to your settings.
If you try the above method and it does not work, it is possible that your computer does not allow you to change the CPU fan speed. It is possible that the system BIOS prevents this from happening, which is sometimes the case with laptops, or that your CPU fan is not attached to a motherboard fan connector that allows for fan speed adjustment.
